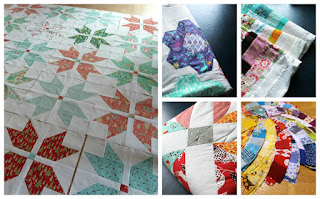
Sunday, October 22, 2017

Destashing fabric

Lately I have been looking at everything I own and have done quite a bit of decluttering and giving away. You just can't own the same amount of stuff when the available square footage dropped to half of what it used to be :) I have come a long way but am only now getting to my crafty things.

I have some fabric bundles that I want  (and for the sake of space need) to sell, so if someone is interested in the following items, please let me know.Either drop me an email at "jonalili at gmx.de" or just comment below. I am also willing to trade and maybe do a bit of christmas shopping this way...


Tula Pink, Prince Charming, 24 Fat Quarters. More photos can be provided upon request.
Price: 340€ plus shipping


Laurie Wisbrun, Perfectly Perched, 15 Fat Quarters. More photos can be provided upon request.
Price: 60€ plus shipping


 Joel Dewberry, Heirloom 13 FQ. More photos can be provided upon request.
Price: 50€ plus shipping.


Heather Bailey, Lotti Da, bigger scraps of fabric (445g/14,7 ounces).
Price: 20€ plus shipping.


And now for the "not quilting fabric" portion of my destash (I wrote the dimension on each piece of white paper, each paper meassures 3,5 Inch):


SOLD
Polar fleece, 1x1,5m.
Price: 2€ plus shipping

SOLD
 Also not wool, but jersey, 1x1,5m.
Price: 3€ plus shipping


SOLD
Wool scraps: pink in left corner: 1,5x0,5m; grey in right corner and blue at right bottom was snatched up by a friend so those are not included; scraps at left bottom (the red one was stained when I handwashed it together with a dark whool fabric): each at least 0,2x0,7m.
Price for all: 5€ plus shipping


purple wool bundle: left fabric: 0,5x0,6m; right fabric: 0,6x1,0m.
Price: 3€ plus shipping.


SOLD
red plaid wool: 1,8x1,6m.
Price: 4€ plus shipping 


grey fabric bundle: top left, cotton polyester, 0,5x0,65m; top right: corduroy, 0,4x1,4m; bottom left: grey wool, 0,5x1,5m; bottom right: finer wool, 0,6x1,2m.
Price: 5€ plus shipping


mix bundle:top left: light grey soft wool: 0,5x0,5m; right fabric (I belive that there is some cotton and polyester in there): 0,5x0,4m; bottom left: red black wool, 0,5x1,1m.

walking foot for high shank sewing machine: doesn't work on my industrial sewing machine but maybe on yours?
Price: shipping


Book One yard wonders: used but complete and in relatively good condition (no torn pages, nothing missing etc.).
Price: 2€ plus shipping


6 purse frames in varying sizes and colors.
Price: 8€ plus shipping

Let me know if you are interested in something - either by email (Jonalili at gmx.de) or leaving a comment - I can send you an estimate about shipping - the lighter ones will be around 4,5€ internationally, 2,6€ in Germany. The heavier bundles around 6€ in Germany, 35€ international insured shipment. You are responsible for paying taxes and importing fees.


Thank you and happy shopping,
Johanna

Tuesday, July 4, 2017

Q 3 FAL List

It is time to list all my quilts that I hope to finally finish in the next quarter. 
I have to say that I am even worse at finishing my quilts than I feared I would be :) Well, there is always the next quarter of the year...

I did finish my heart quilt (post to come) and I did finish the baby book so they don't go on my list but there are still plenty of quilts left:

  • making a black and green quilt with a basket weave pattern, on which I made some progress and cut the fabric to size

  • the hexie quilt finally has a backing but it still needs quilting
  • the log cabin quilt also has a backing but also needs quilting
  • my christmas quilt was made into blocks and then... well it needs anything else. Because there were wonderful suggestions in the last post (thank you!) I still haven't decided which route to go
  • I began quilting the Flea Market Fancy quilt but haven't finished yet
  • my Double Wedding Quilt still isn't even pieced into blocks yet

So that is it, only six projects left :)
How are your projects doing?

  
Linking up with the 2017 Finish A Long:


Monday, April 24, 2017

Babybook: Hungry Caterpillar

So, for christmas I gave one very special baby the promise to finish his book about the very hungry caterpillar soon. 
There are all kinds of colors and textures (woven, knitted wool, flannel, plush fabric, quilting fabric, seersucker, and the caterpillar at one of the last pages has been stuffed with batting to show that it really has eaten a lot) and there is even a rattle and some pages are crackling because I lined them with oven bags. Since I finally finished it and gifted it to him, I can also share pictures:


Have you ever sewn a baby book?

Johanna

Wednesday, April 5, 2017

Q 2 FAL List

Well, the optimism from January has changed to well mannered realism. 
I was planning on finishing all my projects in the first three months of the year but it seems I not only didn't pull that off but also managed to gain a few extra projects.

Let's start with the new projects:
 
  • finishing the baby book (the very hungry caterpilar - I love the book and I needed to make a baby version) I started and finally gift it 
 

 I did make a bit of progress on some of my projects:
  • the hexie quilt finally has a backing but it still needs quilting
  • the log cabin quilt also has a backing but also needs quilting
  • my christmas quilt was made into blocks and then... well it needs anything else. Because there were wonderful suggestions in the last post (thank you!) I still haven't decided which route to go
  • I began quilting the Flea Market Fancy quilt but haven't finished yet
  • my Double Wedding Quilt still isn't even pieced into blocks yet


 Linking up with the 2017 Finish A Long:


Monday, February 20, 2017

With or Without?

In my last post I showed you how I did my star blocks. They are all finally finished but I just don't know whether to use sashing in between the blocks or just go without. I am also thinking of adding a tiny border around the quilt top once it is finished. Or maybe not?


What do you think? Any opinions? Sashing, border or not?


Thank you,
Johanna

Wednesday, February 15, 2017

Nordic Star Quilt Block Tutorial

Just the other day I was thinking that I should really cut the fabric for my Christmas Quilt. It is on my WIP list and I thought that Andrea's star pattern would be wonderful - but then I came across this image of a pillow and then I saw Rachel's winter mint Quilt and just like that I changed my mind about the pattern. I will be using Andrea's tutorial next time I am starting a quilt.

And since I couldn't find a tutorial for this particular block, here is my own. I am sure that there is a traditional block like this, but since I couldn't find it, I had to come up with a name myself.

 
Nordic Star Quilt Block

for each block (15 3/4" or 40cm) you need:

background fabric:
4 x 4" / 10cm squares
4 x 4 3/4" / 12cm squares
4 x 8" x 1 3/4" / 20cm x 4cm rectangles

focus/colored fabric:
4 x 4" / 10cm squares
4 x 4 3/4" / 10cm squares
1 x 1 3/4" / 4cm square


Instead of the 4 3/4 Inch (12cm) squares you can also get away with using 4 1/2 Inch (11,5cm) but since we will be using theses for half square triangles and mine rarely turn out perfect, I like to have some wiggle room for trimming. 

I sewed this block in cm so the measurements in Inch might seem odd but they should work out as I have always included a tiny bit of room for trimming.

Seam allowance is 1/4" or 1/2 cm.

Instructions:

Take your 4 3/4" (12cm) squares and put a colored one and a background one right sides together.


I like to arrange the colored sqaures so that they face in the right direction (with a print that has stripes that means that all stripes go in the same direction). On each back of the background fabric I draw a diagonal line: in two of the four squares I go from top left to bottom right and in the other two I go from top right to bottom left.


Then sew a quarter of an inch (5mm) along the diagonal line on either side.


Cut them apart on the drawn line and press them open, seams to the colored side of the square. 
Then trim back to 4" (10cm).


Now lay all your pieces out according to this picture:


Take your colored squares and sew them to the HSTs right next to it, press the seams to the colored squares.

Then take the background squares and sew them to the HSTs right next to it, press the seams to the background squares.


Now sew them both together, seams should nest. Press the new seam open so that it later lays flat. Trim now if there are any mismatched edges.

Take one long background fabric strip and on either side sew it to the squares we just created. Match the edges in "the middle" meaning where the colored squares meet the background fabric strip. Press seams towards the background strip. Repeat for the other half of the block. The background fabric strip will probably be a bit too long for the block but I didn't trim this until the whole block was completely finished.


Take the remaining two background fabric strips and sew them to the small 1 3/4" (4cm) focus fabric square. Press seams towards the background fabric.

Pin your long strip to one half of the block, making sure that you align the center square of the long strip with the background fabric strip of the half of the block. Seams should nest. Again the background fabric strip will be too long but since we are matching up in the middle, just overlook it at this stage, please.

Sadly I must have forgotten to take pictures at this stage - probably because I was so exited to get the block done. Repeat for the other half and press seams towards the middle. After pressing the entire block, you can trim again. The block should be 15 3/4" or 40cm.


Let me know if anything is unclear! If you make something with this tutorial please leave me a comment so I can come and visit you.

Johanna